
![]()
Click here to jump straight to deploying your bridge!
Bridge Buttons are one of the easiest ways to stand up for the journalists, activists, and vulnerable citizens around the world that depend on Tor to use the internet safely. Tor is an anonymity network that helps keep its users anonymous by routing their internet traffic through multiple different machines run by volunteers, which conceals their location and identity. Unfortunately regimes around the world have blocked access to Tor, which is why Tor bridges were created. They are brand-new access points these regimes do not know about that can be rapidly deployed and torn down faster than they can be blocked, letting these users get back online!
Bridge Buttons let you deploy a Tor bridge with a single click to any Amazon Web Services (AWS) region. These bridges come pre-configured to stay within AWS’ free tier for one year! While you will be prompted for a payment method when first signing up for AWS, these bridges are configured to use a free-tier t3.micro instance running Ubuntu 24.04 LTS, install Tor from Tor Project’s package repository, and have a Tor configuration that caps the bandwidth passing through your bridge at under 15GB per month.
What is a Tor bridge?
You will be acting as an access point to the Tor network. Your bridge is a computer that will relay traffic for these users to their next Tor relay, but the key is that your bridge is never listed publicly. This makes it difficult for it to be blocked. It also helps hide that a user is connecting to Tor since they won’t be connecting to a machine publicly connected to Tor.
Is hosting a Tor bridge safe?
Yes! You may have heard that it can be potentially dangerous to run a Tor exit node, where traffic exits the Tor network. These are different from Tor bridges. Your bridge will not be publicly listed. Your bridge also is an entry point- an exit node makes the final connection to the website the user requests and therefore appears to be doing the “browsing”.
If my bridge isn’t publicly listed, how do people get to it?
Tor distributes bridges to users who request them over email, or via https://bridges.torproject.org/. This makes it difficult for adversaries to compile a list of all Tor bridges and block them, since the number that are distributed at a time is limited.
How do I deploy my bridge?
First, sign up for an AWS account here. While you will be prompted for payment information, your bridge is expected to run on the free tier.
Next, find the region you would like to deploy to in the world and click the corresponding button and then follow the instructions below. Consider deploying your bridge closer to a region that needs Tor bridges. For example, if you wish to help Iranian activists consider deploying to Bahrain.
| Region | Bridge Button |
|---|---|
| US East (Ohio) |  |
| US East (N. Virginia) | |
| US West (N. California) | |
| US West (Oregon) | |
| Africa (Cape Town) | |
| Asia Pacific (Hong Kong) | |
| Asia Pacific (Jakarta) | |
| Asia Pacific (Mumbai) | |
| Asia Pacific (Osaka) | |
| Asia Pacific (Seoul) | |
| Asia Pacific (Singapore) | |
| Asia Pacific (Sydney) | |
| Asia Pacific (Tokyo) | |
| Canada (Central) | |
| Europe (Frankfurt) | |
| Europe (Ireland) | |
| Europe (London) | |
| Europe (Milan) | |
| Europe (Paris) | |
| Europe (Stockholm) | |
| Middle East (Bahrain) | |
| Middle East (UAE) | |
| South America (São Paulo) | |
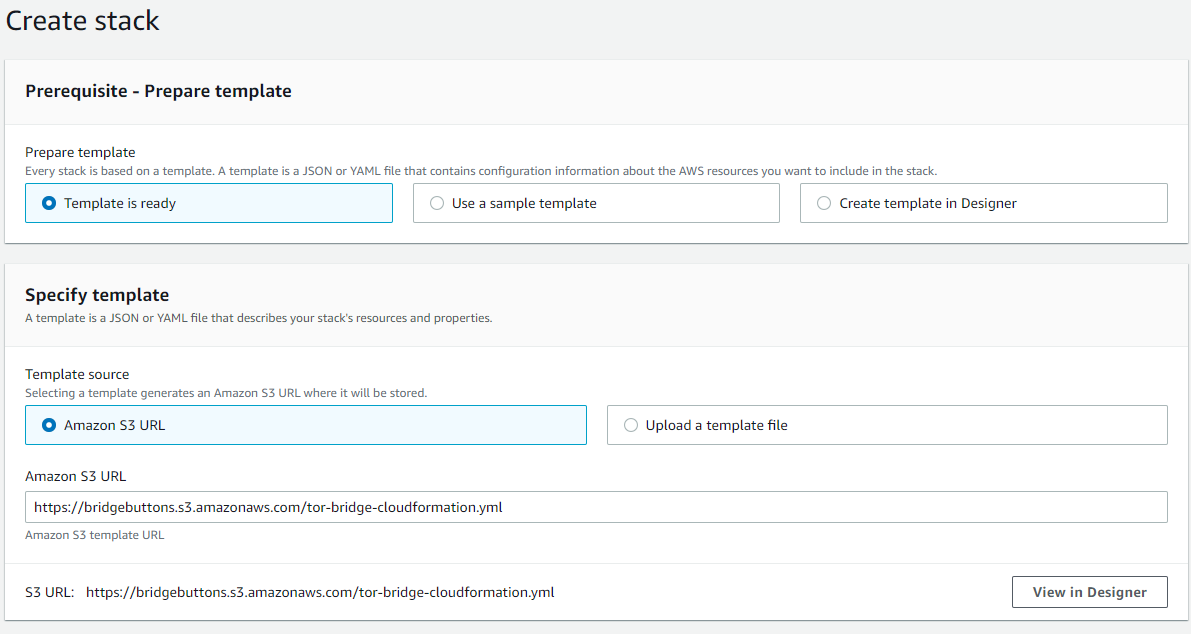
On the next screen, ensure that the Amazon S3 URL is https://bridgebuttons.s3.amazonaws.com/tor-bridge-cloudformation.yml as below and then click “Next” at the bottom of the screen.
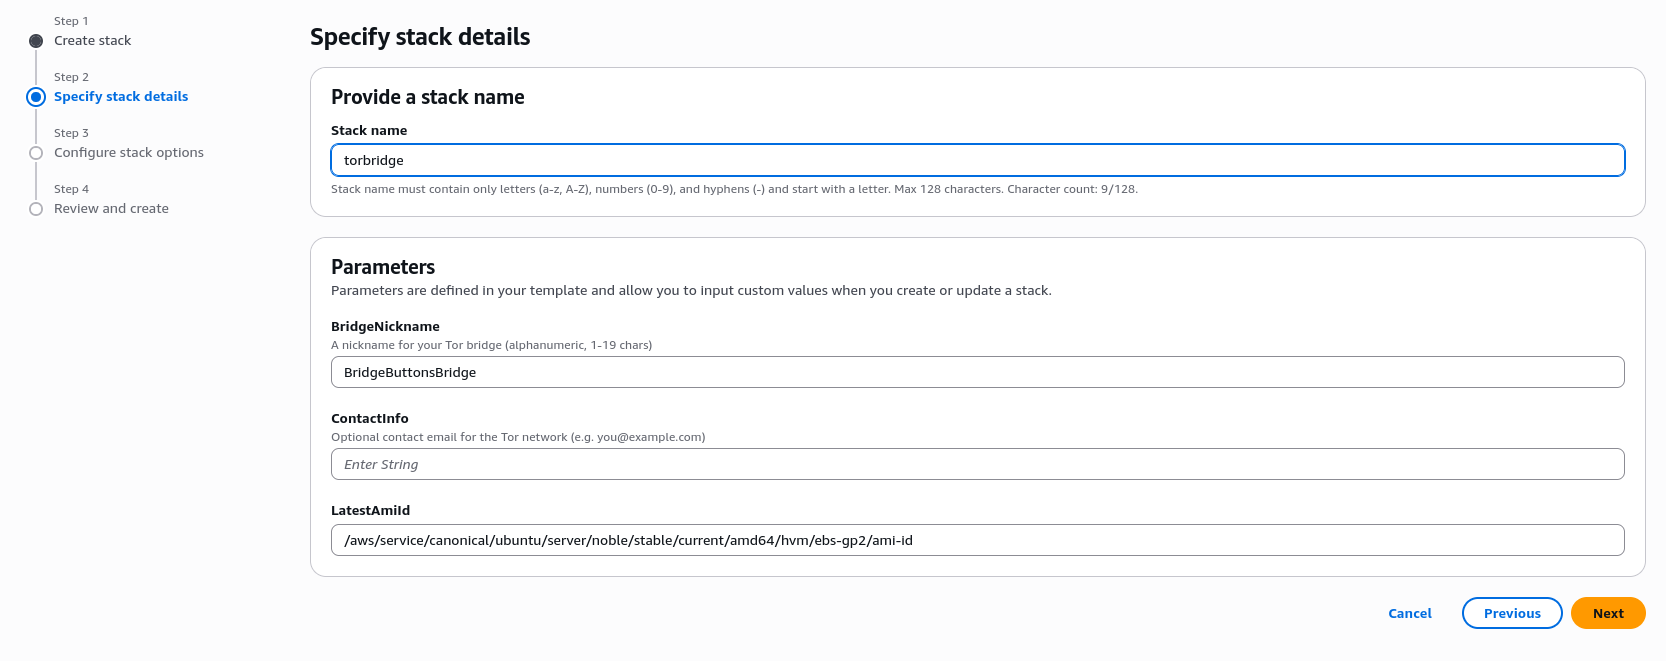
On the next screen, you can customize your bridge’s settings:
- Stack name: Modify your bridge’s name if you wish. This is optional and only makes it easier to find on the AWS console later.
- BridgeNickname: A human-friendly nickname for your bridge on the Tor network (alphanumeric, up to 19 characters). It does not need to be unique. The default is “BridgeButtonsBridge”.
- ContactInfo: Optionally provide an email address so the Tor Project can reach you if there are issues with your bridge. This is recommended but not required.
Click “Next”.
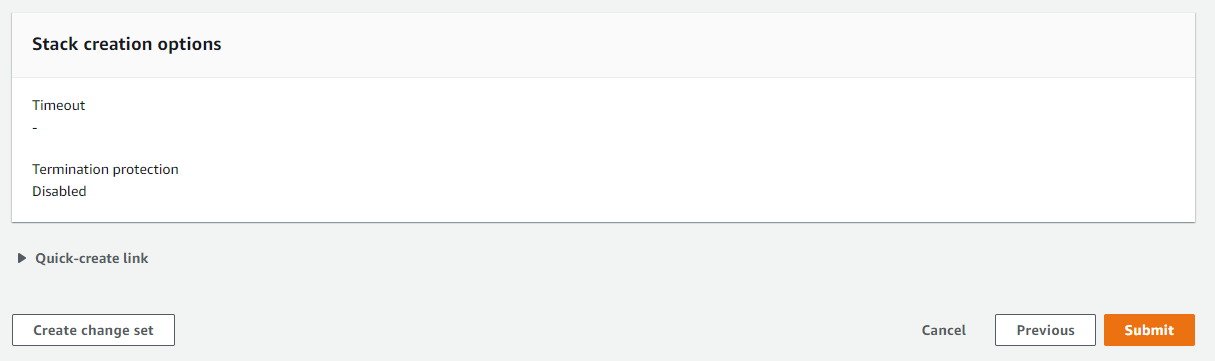
On the “Configure Stack” page leave all options alone and scroll to the bottom of the page. Click “Next”.

On the “Review” page, leave all options alone and scroll to the bottom of the page. Click “Submit”.
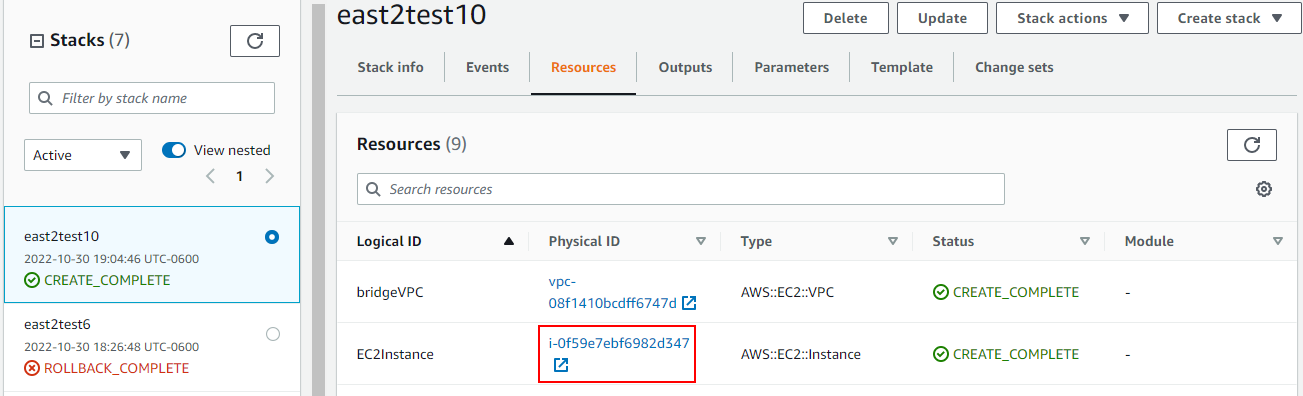
You will then be brought to the CloudFormation screen where you can monitor your deployment. This will take several minutes. When finished, the status will change to green text that reads “Create Complete”. Your bridge is now up and running!

Checking that your bridge is up
This stack does not open SSH to the internet. Instead, Bridge Buttons now waits for the instance to finish bootstrapping before CloudFormation reports Create Complete.
When the stack reaches Create Complete, the instance has already confirmed that:
- Tor started successfully.
- The bridge is listening on port 8000.
- The obfs4 transport is listening on port 8080.
Click the “Outputs” tab in the CloudFormation console after deployment. You will see the public IP address of your bridge, the instance ID, and a BridgeReadiness value reported by the instance itself. BridgeReadiness reflects what bootstrap confirmed during deployment; it is not an ongoing health check.
Even after bootstrap completes, it can still take 20 minutes to an hour for the Tor network to start distributing and using a new bridge, and Tor Metrics visibility can lag by many hours or sometimes a day or two.
Optional - verify through Tor Metrics
If you want a check from the Tor network’s point of view, use the BridgeHashedFingerprint and TorMetricsRelaySearchUrl outputs from CloudFormation.
Bridge searches on Tor Metrics use the hashed fingerprint, not the nickname. The nickname is only a human-friendly label.
CloudFormation displays the BridgeHashedFingerprint output as a JSON object keyed by the instance hostname. If the output looks like {"your-instance-hostname":"YOUR_HASHED_FINGERPRINT"}:
- Search
YOUR_HASHED_FINGERPRINT. - Do not search
your-instance-hostname. - Do not paste the entire JSON object into Tor Metrics.
After the bridge has had time to publish, open the Tor Metrics relay search page and search for that hash value from your stack outputs. If it does not appear immediately, check again later. New bridges can take many hours, and sometimes a day or two, to show up there.
Optional - verify the ports from your own computer
If you want to perform an external connectivity check, replace <public-ip> with the PublicIp value from the CloudFormation outputs and run:
nc -vz <public-ip> 8000
nc -vz <public-ip> 8080
Both commands should report a successful TCP connection. These ports are not web endpoints, so checking them in a browser is not useful.
Troubleshooting
If the stack never reaches Create Complete, open the “Events” tab in CloudFormation. Bridge Buttons now waits for the instance to report successful Tor startup, so a CREATE_FAILED or rollback event means bootstrap did not complete.
If the stack reaches Create Complete but you still do not see activity immediately:
- Confirm the EC2 instance has passed both EC2 status checks.
- Confirm the
BridgeReadinessoutput shows the expected bootstrap message. This confirms deployment-time checks only, not ongoing live bridge health. - Search Tor Metrics using the
BridgeHashedFingerprintoutput after the bridge has had enough time to publish. - If Tor Metrics marks the bridge as
Not Recommended, recreate or replace the instance with the latest template so it installs Tor from Tor Project’s current stable package repository. - Re-run the
ncchecks above after a few minutes. - Allow additional time for the Tor network to discover and distribute the bridge.